Dynamic probing
A dynamic probing record comes either from a recorder installed on the penetrometer (see Uploading records to import the recorded file), or from a manual entry after recording (see below).
Mesured values and test results
The record of measured values and test results (in particular the computation of dynamic point resistance qd) follows the recommendations of the standard NF EN ISO 22476-2:2012.
The presentation of the N10 or N20 values is based on the standards:
- NF P 94-114:1990 Essai de pénétration dynamique type A
- NF P 94-115:1990 Sondage au pénétromètre dynamique type B
The discrimination between the two types is carried out on the following information:
| Property or track | Type A | Type B |
|---|---|---|
| Precaution against rod friction | Drilling mud or Drilling water | None or Use of casing |
| Hammer mass | from 30 to 130 kg | 64 kg |
| Nx value | N10 (10 cm) | N20 (20 cm) |
Creating a dynamic probing
To create a new record of Dynamic probing test see Creating a record.
Entering test properties
The information requested is in general those provided by the standard NF EN ISO 22476-2. All this information is not necessary, however some are required if you want to get correct values of:
- dynamic point resistance qd
- N10 or N20 extrapoled from blow count
The required properties are required in the form
Dynamic Probing (ISO 22476-2):
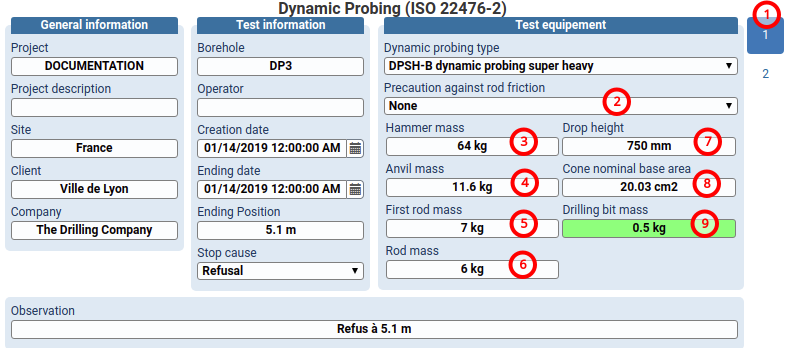
(1) Select panel 1
(2) Precaution against rod friction (e.g. None)
(3) Hammer mass (e.g. 64 kg)
(4) Anvil mass and fall guide (e.g. 11.6 kg)
(5) First rod mass and point mounting (ex. 7 kg)
(6) Rod mass (e.g. 6 kg)
(7) Drop height (e.g. 750 mm)
(8) Cone nominal base area (e.g. 20.03 cm2)
(9) Drilling bit mass (cone mass) (ex. 0.5 kg)
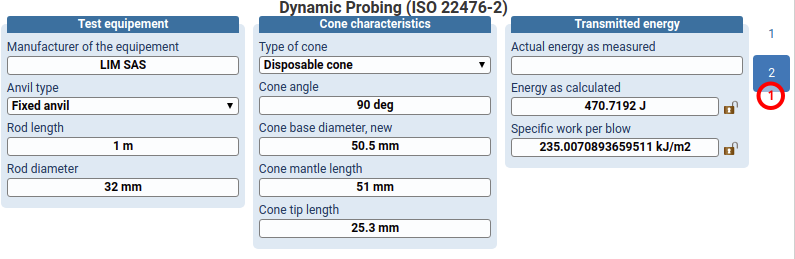
Other information can be entered in the panel 2 (1):
Entering blows counts and rods additions
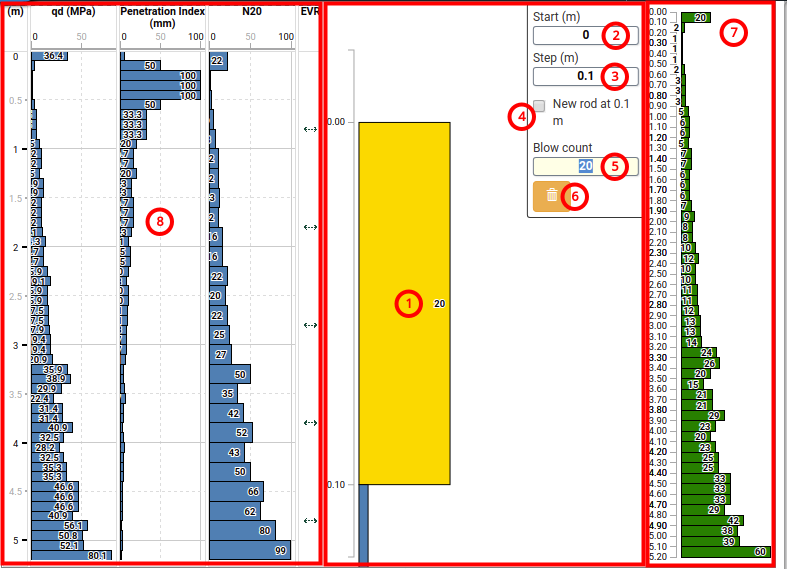
(1) Click an histogram bar to open the entry form.
(2) Correct the Start of the measurement (e.g. 0 (m)) if necessary. The default start depth is 0 m.
(3) Correct the penetration Step (e.g. 0.1 (m)) if necessary. The default penetration step is 0.1 m.
(4) If a New rod is added at the end of the penetration, check the dedicated box.
(5) Enter the Blow count value (e.g. 20).
Move to the next measurement with the Enter key.
The arrow key ⇩ allows to move the next measurement.
The arrow key ⇧ allows to move the previous measurement.
(6) Optionally, delete the current measurement.
(7) Blow counts entered are displayed on the green track at the right side.
Click on the yellow bar (1) to exit the edit form.
Once the input is complete, the tracks qd (Mpa), Penetration index, N20 or N10, EVR (Rod event) are refreshed.
If the measurement step is constant (e.g. 0.1), then the tracks qd (MPa), Penetration index are displayed as histograms. Otherwise, the tracks qd (MPa), Penetration index are displayed as curves.
The track N10 or N20 (depending on the case determined by the standard) is displayed only if the measurement step is different from the standard step.
Creating a PDF
You can generate the PDF report from the current dynamic probing.
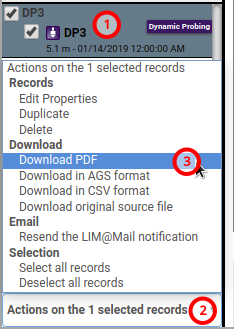
(1) Select the record Dynamic Probing
(2) Open the list of Actions on the 1 selected records.
(3) Choose Download PDF