Creating a tracks template
Standard templates
- For drilling parameters of LIM 4G devices: 4G -VIA-PO-PI-
- For drilling parameters of LIM 5G devices: 5G -AS-TP-TQ-
NOTE: These templates should not be modified. They will be reset during each update.
Creating a template
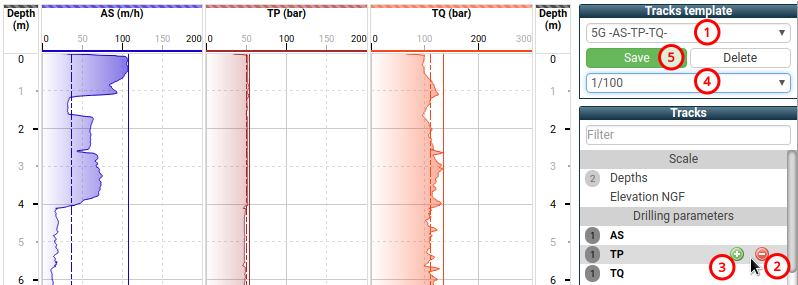
(1) Select any Tracks template (e.g. 5G-AS-TP-TQ)
(2) ![]() Delete the track you do not want in your template
Delete the track you do not want in your template
(3) ![]() Add missing track
Add missing track
(4) Adjust the vertical scale (e.g. 1/100)
(5) Save and enter the name of the new template (e.g. DEMO)
NOTE: As soon as you modify a template property, the Save button changes color to encourage you to keep what you have just changed. If you do not save, the changes will be lost.
Updating a template
(1) Select the desired Tracks template you want to edit (e.g. DEMO)
(2) ![]() Delete the track you do not want in your template
Delete the track you do not want in your template
(3) ![]() Add missing track
Add missing track
(4) Adjust the vertical scale (e.g. 1/100)
(5) Save the template while keeping the same name (e.g. DEMO)
Changing the depth scale
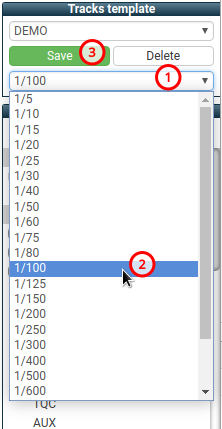
(1) Click current scale (e.g. 1/100) to show the list
(2) Choose the new scale
(3) Save the template
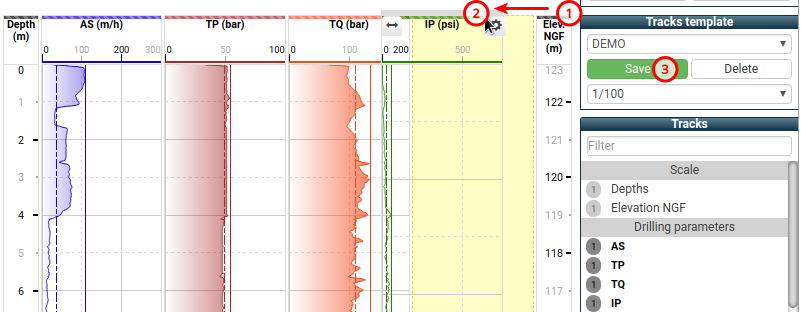
Adding a track

(1) Search the track you want to add. The tracks are classified by type of record (e.g. Drilling parameters)
(2) The bold names indicate their presence in a selected record (e.g. IP)
(3) Click ![]() to add new track (e.g. IP).
The new track appears in the report to the right of the existing tracks
to add new track (e.g. IP).
The new track appears in the report to the right of the existing tracks
(4) Save the template
Moving a track
(1) Select the track (e.g. IP) by clicking and holding the cursor on the track header
(2) Move track to its destination. Release the cursor to put down the track
(3) Save the template
Deleting a track
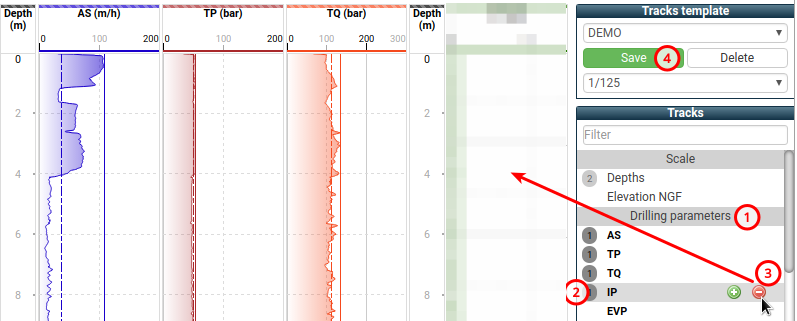
(1) Search the track you want to delete. The tracks are classified by type of record (e.g. Drilling parameters)
(2) The number in the gray circle (e.g. 1) indicates the number of occurrences of the track in the template
(3) Click ![]() to delete the track (e.g. IP)
to delete the track (e.g. IP)
(4) Save the template
Editing track width
Track width types
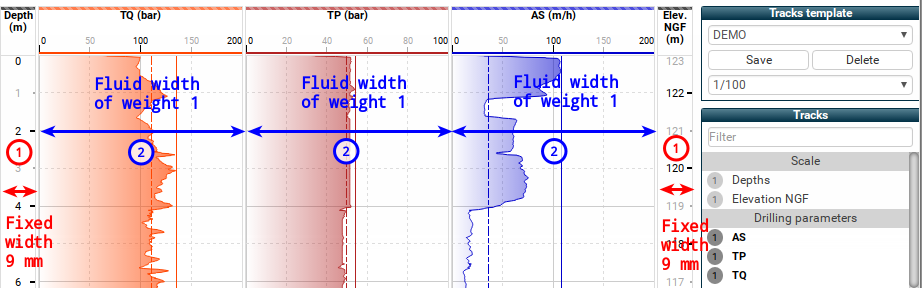
There are 2 types of track width:
(1) fixed width (e.g. 9 mm)
A fixed width track occupies a constant width, determined by the length entered. In the present example, the tracks Depth, Elev. NGF have a fixed width of 9 mm. Fixed widths should be used only for tracks whose width must not depend on the output format.
(2) fluid width
Fluid width tracks fill the remaining available space not occupied by fixed width tracks. Fluid width is expressed as weight (e.g. 1, 2, 3, etc.). In the present example, the tracks TQ, TP, AS all have a weight of 1, and therefore all have the same width. Fluid widths allow the tracks template to occupy the full width available, regardless of the output format (A4, A3, portrait, landscape, etc.). They should generally be preferred over fixed widths.
Editing fluid width

(1) Place the cursor at the left end of the track header.
Click ![]()
(2) Select Fluid
(3) Click
![]() to decrease track with, or click
to decrease track with, or click
![]() to increase it
to increase it
(4) Save the template
Editing fixed width

(1) Place the cursor at the left end of the track header.
Click ![]()
(2) Select Fixed
(3) Enter the desired fixed width (e.g. 9 mm).
Confirm the value with Enter key
(4) Save the template
Editing a curve
Editing the scale of the track

(1) Place the cursor at the right extremity of the track scale. Roll the mouse wheel up to decrease the maximum value of the scale. Roll the mouse wheel down to increase the maximum value of the scale
(2) Place the cursor at the left extremity of the track scale. Roll the mouse wheel up to increase the minimum value of the scale. Roll the mouse wheel down to decrease the minimum value of the scale
The increment or decrement is equal to the current scale.
(3) Save the template
Editing the curve
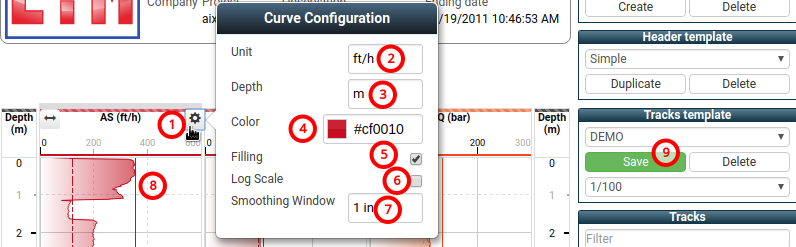
(1) Place the cursor at the right end of the track header.
Click ![]()
(2) Enter the new Unit of the curve (e.g. ft/h)
(3) Enter the new Depth unit (e.g. ft)
(4) Edit the new Color by typing an hexadecimal value (e.g. #cf0010) or by using the color picker
(5) Check Filling to fill the curve on the left
(6) Check Log Scale to display the curve in the decimal logarithm scale
(7) Define the Smoothing Window of the curve (e.g. 1 in)
(8) Click into track area to close the dialog box
(9) Save the template